

How To Make A Good Drywall Repair On Outside Corner
How to Install Paper-Faced Corner Bead
Updated: Feb. 01, 2022
Paper-faced corner dewdrop makes taping outside corners a snap

Exterior drywall corners have traditionally been protected with nail-on metal corners, simply paper-faced corner bead is simpler and resists cracks and chips better. All you need to install it are taping knives and a spray bottle filled with water.
Y'all might besides like: TBD
Overview: Corner Wall Beading
Traditional metallic corner drywall bead is boring and time-consuming to install, and if yous don't embrace metal corner with tape, it'south probable to develop cracks along the edges. Luckily at that place'due south an alternative that'due south simpler to install that metal corner and won't crack. If you're an one-time-school carpenter like me, yous've probably dismissed paper-faced drywall corner bead equally an junior DIY product, only trust me, once you attempt information technology, you'll never go back.
You'll find paper-faced drywall corner bead alongside standard metal corners in home centers and drywall supply stores. It costs a piddling more than, almost $3 for an eight-ft. length vs. $ii for the metallic dewdrop. But the wall beading is worth every penny.
Pros employ a special hopper to apply articulation compound to the corner bead and an expensive rolling tool to embed the bead, but you lot can become the same benefits using a 3-in. potent putty knife, a 5- or 6-in. flexible putty knife and a spray bottle filled with water. Hither's how to install paper-faced corner bead, including a few tips to simplify the job and avert problems.
Step i: Cutting the drywall paper beading with tin can snips
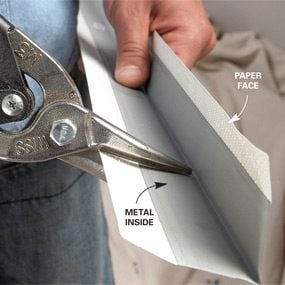
Cutting to length
If you demand to cutting pieces to length, simply hold the wall beading in place, marking the cut, and cut the bead with tin snips. Where pieces run to the floor, cut them about one/ii in. short. The baseboard will cover the gap.
Stride 2: Mud the corner
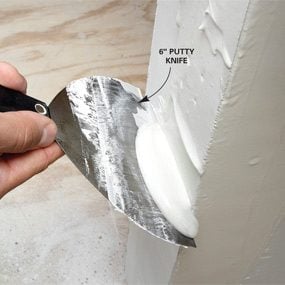
Basecoat
Spread a thick layer of all-purpose joint compound on both sides of the corner and smooth it off with a putty pocketknife. Avoid lightweight articulation compound because it doesn't adhere likewise to the corner bead. Strive for an even, consequent layer of joint compound about i/8 in. thick. Don't go out any thin or dry out spots.
Pace 3: Mist the wall beading
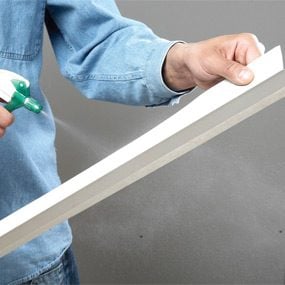
Damp drywall paper bonds better
Wetting the newspaper covering on the corner bead helps create a better bond and better adhesion and cuts down on wrinkles. Do this past spritzing the corner wall beading earlier you stick information technology to the wall. Yous don't have to soak the corner bead; just dampen information technology a chip.
Step iv: Position the drywall paper bead
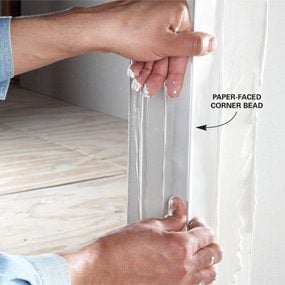
Push button into place
Press the dampened corner bead into the articulation compound with your fingers. Run your fingers upwards and down while pressing evenly on both sides to embed and center the corner bead.
Step 5: Embed the tape

First laissez passer
Later positioning the wall beading, wipe and smooth off backlog joint compound with a 5- or half dozen-in. putty knife. Press the edge of the tape with the pocketknife bract to ensure a tight bail with the drywall.
Footstep 6: Use staples to marshal corners

Fastening tip
Beads that intersect at corners accept to align perfectly where they meet. Merely without nails to hold them in place, the beads can slide out of position. The solution is to slide the corner bead into alignment with the adjoining bead and concur it in place with a few staples.
Stride 7: Bank check the corner with your blade

Go out a void for chemical compound
A perfectly positioned corner bead protrudes slightly at the corner to allow a void for joint compound. Afterwards you identify the drywall newspaper bead, cheque for a void by setting your 6-in. putty knife against the corner to make certain there's a infinite under it. Bank check both sides in several places along the length of the corner. Slide the corner in or out to make adjustments. Use staples to concur the corner in identify if information technology won't stay put.
Step 8: Scrape away excess mud before it hardens
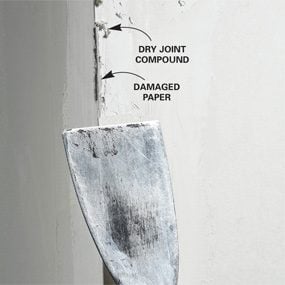
Don't gouge dry corners
Scraping dried joint compound from the corner can damage the paper tape. Remove excess articulation chemical compound before it hardens. Carefully slide a putty pocketknife along the outside edge to knock off backlog joint compound.
Footstep 9: Finish up with ii more coats of joint compound
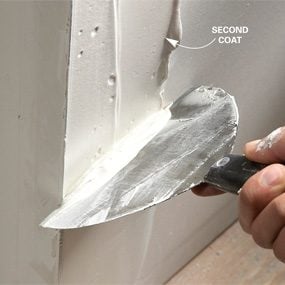
Final passes
Afterward the embedding coat of mud is dry, apply another coat of joint chemical compound and polish it. Do a final coat subsequently the second coat dries. Sand the corner with 150-grit drywall sandpaper mounted on a drywall sander. Sand advisedly and only enough to blend the articulation chemical compound into the drywall and remove high spots. If you sand also much, you'll harm the paper face up on the corner wall beading. If y'all exercise sand through the joint compound and create a fuzzy area, cover it with a sparse layer of joint compound and resand when it dries.
Required Tools for this Project
Take the necessary tools for this DIY project lined upwardly before you lot start—you'll save time and frustration.
Y'all'll too demand a spray bottle
Required Materials for this Project
Avoid concluding-minute shopping trips past having all your materials set ahead of fourth dimension. Hither's a listing.
Originally Published: February 01, 2022

How To Make A Good Drywall Repair On Outside Corner,
Source: https://www.familyhandyman.com/project/how-to-install-paper-faced-corner-bead/
Posted by: schmidtweressid.blogspot.com
0 Response to "How To Make A Good Drywall Repair On Outside Corner"
Post a Comment